Saturday, May 30, 2009

caardvarks: Shape Up! & Cuttlebug Challenge: Be Inspired 33


Inside:
Congratulations on your Graduation

You have brains in your head.
You have feet in your shoes.
You can steer yourself
Any direction you choose.
You're on your own.
And you know what you know.
And YOU are the guy who'll decide where to go.
--Dr. Seuss, from Oh, The Places You'll Go

I made this card for a dear friend who just graduated from law school -- Congrats B, Esq!
I am also submitting it for the Shape Up challenge from caardvarks! The challenge was to think outside of the box and make a card that wasn't a square or rectangle. I also added the monogram for the Cuttlebug Challenge [my first one!] Be Inspired #33 -- Monograms, which adds a personal touch for a nice sentiment.

I made the tassel from some yarn (making it up as I went), and used a brad plus a Glue Dot to make sure that it was securely attached. The papers are from Target's Dollar Zone (a great place to find inexpensive supplies). The "B" was made in Word. All in all, a colorful yet still masculine way to celebrate such a great accomplishment.

Thursday, May 28, 2009

Since I Knew You Were Coming... I Baked A Cake!

This recipe is a modified version of "Taste the Rainbow" from  I *Heart* Cuppycakes, my absolute favorite baking blog. [http://iheartcuppycakes.com/2009/04/12/taste-the-rainbow/]

I have been waiting for the next opportunity to bake so that I could finally try this amazing recipe, and after all of the chaos of my 2nd year of medical school, exams were complete, and there were 3 May birthdays among my group of best friends.  We celebrated our accomplishments and increasing wisdom with this cake!

**Disclaimer: In advance, I again apologize for the lack of pictures for certain steps.  Clearly my instructions skills need to be improved.  Will do better in the future.**

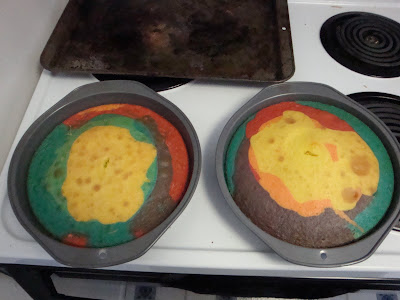
I used white cake mix (nothing from scratch here!).  I had just tried blue and white cupcakes for my alma mater, but the color was not as bright as I had hoped.  After reading a little online, I heard that gel food coloring provides for really bright colors (and doesn't mess with the taste).

I divided my cake mix (made per instructions on the box) into 6 bowls.  To these bowls, I added food coloring to make 6 bright rainbow colors.  For the colors that are not the standard 4 provided, I used the ratios provided on the box or just made it up as I went (not very scientific for someone in the sciences, huh?).

I added these colors into two 8" cake rounds, adding about half of each color into each.  I tried to make the order the same as the rainbow, but starting with different colors in each of the rounds so that the cakes were not just duplicates.  (Again, I just sorta added them as I felt I should).

I then baked them per instruction on the cake mix box.  Then I impatiently waited for them to cool.... the smell is very tempting!

Not wanting to just use plain white icing, I decided to make a sky/powder blue creation by opening two pre-made icing containers, and adding blue until I liked the color.  For this step, you could use whatever color moved you!  It allows for some additional variability in theme, too!  

After icing one layer, I added the next cake, iced it and added some fun sprinkles!  [Note: cake decorating skills also need to improve... still delicious though!]


Later that night, anxiously awaiting the reaction from the crowd, I cut the cake.  Everyone was really surprised how colorful the inside of the cake was-- enough to match the outside.


All in all, I will do this cake a million times over.  And do different color variations for different events, some ideas:
  • Another round and Blue&White cupcakes for my alma mater (or any alma mater for that matter.  Get it... mater... matter!)
  • Red, white and blue for Memorial Day or Fourth of July
  • Favorite colors for friends' birthdays
  • High school colors for upcoming graduation season
Check out I Heart Cuppycakes for even more outstanding ideas...

The Lucky Birthday Girl...

This past week I celebrated my birthday -- a quick but nice break from studying. And boy, did I get some great loot. I am so excited to be able to expand my supplies, so I thought I would share my newest toys that I got from my MIL & FIL:

A Sizzix Sidekick
This little guy is the perfect way to get into die-cuts, especially if you don't have your own craft space. I used the Sidekick that my MIL has, and am so excited to have one of my own. I know that I will be looking for new kits to add. In addition to the machine, I got a few die-cuts to start off with.

These two embossing folders are from Cuttlebug, but work with the Sidekick.


I also got these two Sizzix die-cuts. I really love the Stuffed Animal set, even though the blue bunny is a little Donnie Darko for me. But I cannot wait to make these animals in pretty pastels for baby cards! And you can never go wrong with more supplies for birthday cards!


Beyond just die-cut supplies, I also received some Cutter Bee scissors. I didn't appreciate how useful having a very sharp pair of scissors is until I used these. I don't think I will be able to use anything else anymore!
As a present for myself (which was then added by my MIL to all of my loot), I picked up a new Fiskar's paper punch. I love the design of these because you can see exactly where you are punching, and the grip makes them much more comfortable to use. I don't have one, but my MIL does (what doesn't she have!). I got the Seal of Approval pattern, which is a large circle with scalloped borders. Expect to see that on a bunch of cards in the future!


[All images for supplies from Joann.com]

And for endless inspiration to use all of my supplies, I got a subscription to Paper Crafts magazine! The gift that will keep on giving. A million thanks to Momma S!

Now for something other than crafting supplies: my husband got me a fabulous birthday gift: a throw-back powder blue Pittsburgh Penguins jersey. I have been eyeing these up since they released them this past year, and just in time for the STANLEY CUP SERIES (Go Pens!), I got my own! What a wonderful hubby; he always picks up on those little things that I say!
[Image from football-jerseys.org]

A very happy birthday indeed.

Thursday, May 14, 2009

Manly Cards

Cards for girls are easier.  They can be pink, and full of ribbons or bows.  They can sparkle and shine.  But the challenge of making cards for my father and father-in-law limited my paper selections and made me thinking of new ways to add layers and still preserve the manly factor.

The tie came naturally (not another tie!), and I added details by selecting a paper that was geometric (cannot go wrong for that manly feel) and blocks of color that complimented the tie and paper.  I found these tags that matched the stripes on the tie, and just added a little yarn for some dimension.  I really like this pair, and hope that our dads do too!


caardvarks & 2S4Y Challenges

I LOVE particpating in challenges... especially the two from caardvarks and 2 Sketches for You.  This card was inspired by the "Don't Quote Me, But..." caardvarks challenge, and Kazan's Sketch # 26.

I attempted to add depth and details to this project.  I really spent time planning it all out, and tried with each item to add an extra layer or an embellishment.  I'm really proud of the final product!


And I'm Back! With A Light Box...

The finals of second year have been finished.  I have sat in the auditorium for a basic science lecture for the last time.  Ahhh... how sweet these few days will be until I have to start studying again on Saturday for the real exam... the United State Medical Licencing Exam -- Step 1, aka "The Boards."  Until then, I am going to be carding-it-up and allowing for my previously stifled creative juices to get a-flowing again!

My first post (which will be followed by many over the next few days) is sharing my attempt to make a light box so that I can take better pictures of my cards.  The design is modified from the following websites:

As a disclaimer, I made this box with things sitting around our apartment, and in no way is it my final attempt.  I just wanted to see if I would like it.

In place of a large box, I simply used a Sam's Club cereal box that we had.
I cut off the tabs on top of the box.

Then I cut out "windows" in 3 of the sides of the box, leaving the back intact.

I then used white poster board to make the "infinity white" background.  To do this, you cut a piece of cardboard to the width of the back of the box, and tuck it in so that it sits in the box, covering the bottom and one of the sides -- WITHOUT creasing it.  A crease will show in the photographs.

I then used some more poster board to cover two of the sides of the box.  It was recommended to use a light fabric for this step.  For the next one that I will make, I think I will use an old white t-shirt.  I didn't, however, take pictures of this step.  Sorry!  

I would like to purchase an inexpensive desk lamp to serve as the light source that I can move around either from above the item that I'm capturing, or to place it from the sides to shine through the cloth/paper.  Here's the first photograph.  Not perfect.  But I will attempt this again on a bigger and better scale!


Friday, May 1, 2009

Cuttlebug Challenges Spa Weekend

While I may not be carding-it-up for a while, that doesn't mean I've stopped looking at all of the inspirational work that the card making community creates each and everyday.  And what better way to showcase it than with a spa!